Jun 25 2007
Baroque Brocade on River

I knew it the moment I opened my small box of “preview” goodies from the upcoming Stampin’ Up! Fall & Winter Collection ….. I simply adore the new “River Rock” In Color! Although I expected it to appear a little more beige-like … I really enjoy the very subtle hint of green. I’ve used River Rock as the card base here, with a topping of the new double-sided Designer Paper, Brocade Background.
To increase the dimensional look, the Baroque Motifs image was stamped with Old Olive Craft ink on a 1 & 7/8″ square piece of Very Vanilla, then embossed with Clear Embossing Powder. A second image was also stamped & embossed, then cut out to layer atop the first image with SU Dimensionals. The sentiment from Holidays & Wishes was stamped with Old Olive Craft ink. I enjoy the extra lift that only Craft or pigment inks can deliver!

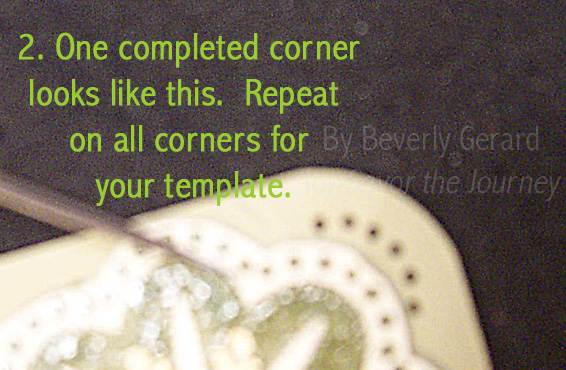
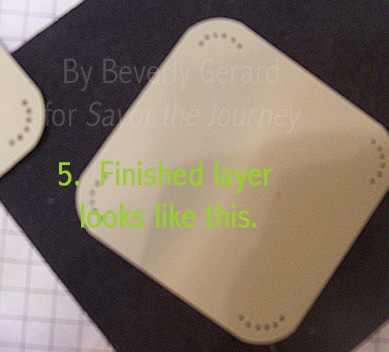
Now about those piercings on the curves: I created my own template by rounding a corner of extra cardstock, then placing an extra Baroque Motifs image directly atop the rounded corner. Next, I pierced right 
 through the dots on the image, creating my template on the rounded cardstock. I used that template to pierce through each corner of the River Rock image layer!
Not being sure of the new SU ribbons to come in the Fall & Winter Collection, I cut “Cream” Grosgrain ribbon, then sponged it with River Rock Classic ink. Yes …. the Cream Grosgrain will be returning in the Fall & Winter Collection! 😉 The ribbon buckle is from SU’s Antique Brass Hodgepodge Hardware.
My mom’s birthday would be today, and I really think she would have liked this as her card. Like me, she was a fan of the olive, earthy shades of green. Mom, this one’s for you!
Card Recipe: Stamps = Baroque Motifs + Holidays & Wishes. Papers: Brocade Background DS paper, Old Olive c/s, River Rock c/s, Very Vanilla c/s. Ink: Craft Old Olive, Classic River Rock. Accessories: Antique Brass Hodgepodge Hardware, Clear Embossing Powder, Cream Grosgrain Ribbon, Corner Rounder Punch, Crafter’s Tool Kit (Piercing tool and Piercing Pad), Sponges, Dimensionals.
18 responses so far


Simply devine! Great colors and I love the idea of making my own piercing template. Thanks for the great blog and wonderful ideas!!!
wow, Beverly…this card is gorgeous!
Wow! That’s a beauty! I’m glad to see you finally broke it open and put it to ink! 😉 It was worth the wait! And how clever are you with that corner rounder, paper-piercing technique?!!! I’m a piercing maniac, so I’ll definitely be trying this, thank you!
This is gorgeous. Love the rounded corners and the piercings. I just finished adding your blog link to the main list over at Splitcoastbloggers. Happy Blogging!
Beautiful card Tex, love that paper and your great corner toot!
I just love this – and the piercing template is genius!!!!!
This card is great, thanks for the tip on the paper piercing on the rounded corner.
happy birthday to your mom, my dear.
Thanks for visiting my blog….had to come see yours : ) Love this card! And wonderful tutorial! I can’t wait for the new catalog!
Beautiful, Bev — love the piercing and rounded corners! Yes, I love these new colors, too!
Hey Bev! Just because of this card, I had to order the Baroque paper. I didn’t order it before because it’s not my style… but I guess it is now! TFS… truly inspiring!
Great tutorial. I need to use my paper piercer more often. Love the look!
Stunning card, truly beautiful
Bev, this is beyond gorgeous! I can’t stop looking at it.
Very pretty, Tex. Love the colors and the rounded corners. So, so pretty!
wow!!!!!!!
A suggestion – when I make a template like you did for your croners, I make it out of quilting template plastic (comes in various thicknesses and colors, even grid) so my patern stays true forever!
I wasn’t thrilled with this color when I first got this but with this combo, I’ll have to try some more cards with it!