May 29 2008
Quick & Sweet Treat!

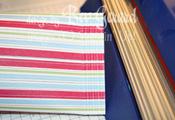
Here’s another project from my SU Stampin’ Club earlier this month. I was inspired by a swap I received quite some time ago from Erin Blair. This one is very quick & oh-so-easy!  For a 12×12 sheet of designer paper, I cut each into 6×6″ squares. Please keep in mind that this sized pouch will not accommodate every package of candy you find, but if you’ll keep your bagged candy purchase to less that 2 oz., it should fit. The less air in the candy pouch, the better. 😉 This is too easy, Ladies! First .. put a line of your snail adhesive across the bottom edge of the 6×6 paper. Also, put a very thin line of adhesive along one perpendicular edge, as seen in the 1st side photo.
.
 When folding the tube together, we won’t overlap very much, trying to save plenty of space for the candy package. Papers are cut 6×6 in order to get 4 from a 12×12 paper. Allowances are ‘tight’. Simply fold over the two sides and overlap to adhere.
.
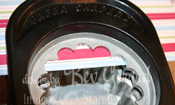
 Next, crimp the glued end with a paper crimper, just rolling it for 3 or 4 “bumps” or ridges on the crimper. Too many ridges will shorten the available length in the tube for your candy treat. 😉
.
.
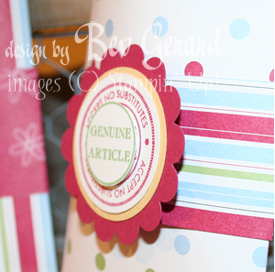
 Use a circle punch or a scallop punch to take a small “bite” from the top of the pouch. This creates an opening by which it’s easy to reach the end of the candy treat for quick removal and enjoyment! Tex’s Tip: If you opt to use a scallop punch, be sure to take a “tiny” bite. SU punches and many others are designed with punching one layer in mind. 2 layers will work if you’re taking a small bite.
 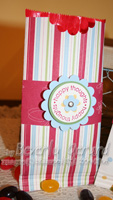 Otherwise, it’s very hard to accomplish, and there is the possibility of ruining your punch and your project.
.
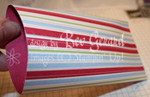
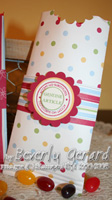
Now it’s time to create your bellyband with coordinating paper, 1.25″ x 6.5″. I’ve used SU’s ‘Cutie Pie’ desiger papers for this project. Tex’s Tip: Put your candy treat inside the pouch first, to get a better idea of how tight to make the belly band. Glue the ends of the belly band together and slide onto your pouch.
.
.
.
 Punches used for my project were the 1 & 1/4″ Circle Punch, 1 & 3/8″ Circle Punch, 3/4″ Circle Punch, and Scallop Punch, all from Stampin’ Up! For added interest, I layered elements with SU Dimensionals. Stampers were offered their choice of stamps from “Stamp of Authenticity” and “Think Happy Thoughts” to complete their projects.
I promise … these are much quicker to make & enjoy than they are to “write about”! hahaha I hope you enjoy! Thanks for visiting today!
16 responses so far


Bev, these are fabulous! Love the bite marks! All paper are yummy!
Your treat pouches are sooo cute, Bev!! I love the papers you used, and your scalloping!! The “bite” is such a great idea too!!
Oh Tex, this is way beyond cute!! What an awesome project, I’m totally going to case it! Love the colors too, so very me! I know the ladies loved this one, thanks for sharing it with us!
These are so cute Bev!
Too cute! I am going to try this with my club this weekend! I think they will love it!!!
these are great, loving the papers.
Very cute.
These are darling! What a great idea, thanks for sharing!
How cute!! I think I will do something like this for my Halloween treat bags this fall!!
Really, really cute idea Bev! I will have to try this!
Mmmmm, looks yummy and fun Tex!
These are TOO STINKIN’ CUUUUTE!!!
We need to get together again, soon!! Hugs-Jd
WOW! I love this idea! Thanks for the tutorial
Simply wonderful!!! Thanks for the details, too.
Love these! Such a wonderful and simple idea for a class project. I just LOVE stuff like this!
Bev these are so cute! AND quick.
I think I’ll make some of these for favors for the dinner.
100 of these would be fast! Thanks for sharing! Kim