Dec 03 2008
Blogger’s Challenge – RNBC12 * Nix the Ribbon! *
Good morning, everyone! I’m delighted to present our Rubbernecker Bloggers’ Challenge #8 ( RNBC12 ) ! In previous challenges we have been treated to a splendid sketch, paper-piecing, and lots more! Today, I’m challenging everyone to “nix” the ribbon, and instead, use some other type of fiber! Ideas include twine, hemp, threads, eyelash fiber, embroidery floss, cording, … you name it! I’ve chosen to unravel some metallic cord for my project. The overall design simply needs to include a fiber “other than” ribbon! (Please do not give my hubby the satisfaction of saying that stampers cannot work without ribbon!) hahaha
You might be thinking, “How do I play along?” It’s so easy! All you have to do is use the challenge requirement and upload your project to your blog and/or your online gallery. We love to showcase your projects on the Rubbernecker blog, and ask that you please come backto the Rubbernecker Blog post, and add a link to your project in the comment section. In other words, we love looking at new eye-candy just like you!
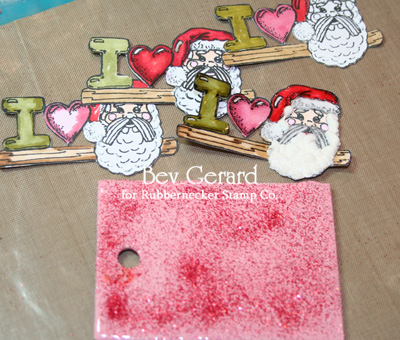
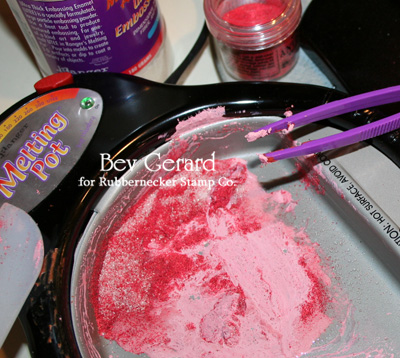
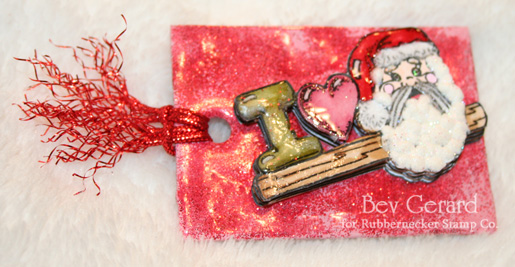 My project is not a card, but rather a ‘pin‘ to be worn on a jacket, coat, or sweater during the holiday season! Please feel free to create a card or a non-card project .. it’s all up to you! The base of my pin is actually a laminate sample from our nearby home improvement store. I merely melted some distress embossing powder in my melting pot, and dipped/coated a laminate sample into the melted goody! (I’ll admit that I am so thankful to have the Melt Art tools to accompany my melting pot!) I used my heat tool to even out any ‘warped’ waves, and as long the work is done atop the non-stick Craft Sheet, all surfaces are safe. By the way … you MUST check out the Rubbernecker Clearance SALE going on right now!
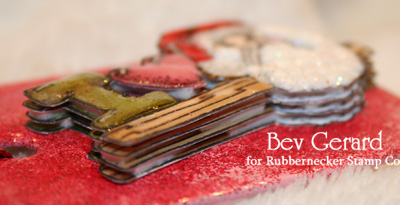 This time, I’ve created my first ‘paper toile’ project. The main image was stamped, colored, & cut out 4 times. Each layer is stacked below the next. The top layer is the only one to receive the glossy accents, although all layers are colored with Copic Markers. This is a first for me, inspired by a recent card I’ve received from an International Cyber-friend. Thank you , Meda, for your gift as well as for the inspiration to “stretch“! I’ve attached a simple pin attachment to the back, with my trusty cool-temp heated glue. You could substitute with E-6000 glue if you prefer. My fiber is actually a red metallic cording that I have ‘untwined’! I wanted something a little different than the usual cord or hemp. You might be surprised at what happens when you “unwind” ribbons or cords in your stash!
Project Recipe: STAMPS — I Love Santa
INKS— Memento Tuxedo Black, Copic Markers
PAPERS — PaperTrey Ink White
ACCESSORIES — Melting Pot, Ranger Antiquities Embossing Powder Chinese Red, Melt Art Ultra Thick Embossing Enamel, heat tool, Embossing Tinsel – Red, Quick-Dry glue, Ranger Glossy Accents, foam tape, pin-attachment (JoAnn), liquid applique, Vintage Glass Glitter, Ranger Craft Sheet.
8 responses so far


What an adorable Christmas pin, Bev….I love the look of the glossy accents and all the layers…sooo cool!!! gotta try this, for sure!!!
Oh Bev…your pin is just darling!! Your toiling is fabulous, and well as your coloring!! What a lovely lacquer finish also!!
SO super cute!!! Love them!!
WOW, look at all the layers! Blew me away again, Bev!
This is a darling pin, Bev. I need to start thinking out of the box more for projects. Thanks for the inspiration.
Darling, darling pin Bev. I love all the layering here. Love this!!
What wonderful dimension, Bev! I love this project!
As soon as I saw this project I knew where it has been inspired from. It looks great!