Sep 02 2009
Ready for a challenge? “Cut It Out!”
Hi there, everyone! I’m tickled to be the hostess of the Wacky Wednesday Challenge #27 for you today, “Cut It Out”! No, we’re not talking about a diet … whew! The challenge is simple … Be sure to use your scissors to cut something out for your project! For example, cut out your images, or images, or items for paper-piecing, etc. The ever-popular die cuts from our treasured machines will not count as the ‘cut out’ element, but you’re welcome to use them along with your scissor-cut elements if you like. (Truth is, I’ve even used these on my sample!) So come along, grab your scissors, and “Cut It Out” !
The winner of this Wacky Wednesday Challenge will receive a 40% Off Certificate for your entire order at Rubbernecker! Plus, everyone who enters the challenge will automatically qualify for a 10% discount on your entire order at Rubbernecker! To receive your 10% discount, use the code WW when checking out. In order to qualify to win, just post a link to your card/project on the Rubbernecker Blog by Monday, September 7. The lucky winner will be posted there on Tuesday, September 8.
Now for my sample! We’re on the journey from Summer, changing into Fall. (Some of ‘us’ are changing sooner than those of ‘us’ in the Southern areas, but I’m speaking strictly from the calendar here.) 😉 Besides, I easily admit that I’m beyond ready to leave the 100’s behind, and savor something a wee bit cooler. In the words of my 5 yr. old g’son, “Oh yeahhhh!”
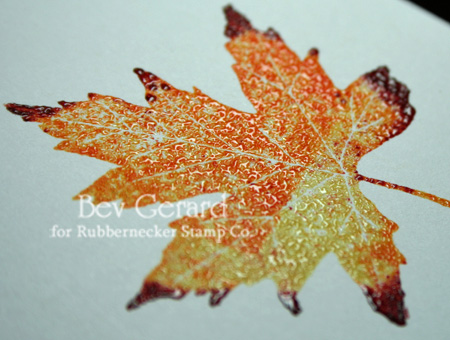 ..
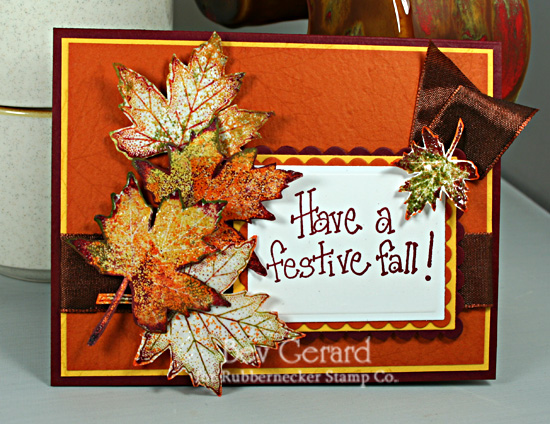
.. 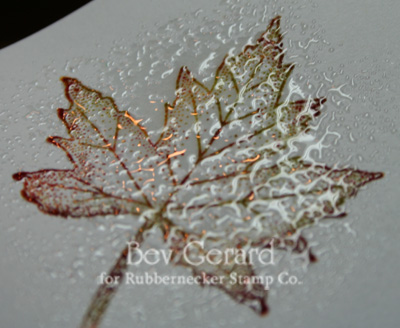 .. (Please click images to enlarge. To return, use your back arrow.) I started off by stamping the leaves with Distress Inks, tapping different colors of ink pads atop the images, then clear embossing with the intention of getting a mottled look to the embossing. In other words, I didn’t want the leaves to be thoroughly embossed. So, I tapped rather than ‘pressed’ with the inks, and added some ‘taps’ with the embossing ink as well. After embossing, I cut out the leaves, then I wiped the leaves with multiple Distress Ink pads, then rubbed atop with a paper towel to get the colors down into the crevices, and clean off the embossed areas. Leaves were adhered with foam tape over a basic design, and very easily finished! Try it, it’s easier than you might think!
After stamping and preparing the leaves, I cut them out and layered them atop the sentiment with foam tape. This often looks harder than it is in reality. If you haven’t tried it, give it a try! Pick a favorite, basic card design, and cut out your image(s) rather than stamping it and leaving it “flat”. You might discover that your really enjoy the new dimension! And please remember to link your creation on the Rubbernecker Blog! We want to see your projects, and you’ll be entered in the challenge contest! Woooooooooooohoooooooooooooooo!!
You’ll find even more inspiration at the Red Hot Mammas’ design team blogs!
Broni – Splashes of Watercolor
Kittie – Kittie Kraft
Linda – Linda’s Works of Heart
Juliana – Stampin with Inky Fingers
Shelly – Stamp with Shelly
Joan –Stamping with a Passion!
Bev – Savor the Journey * Hey that’s me! Thanks for visiting me today! Y’all come back now!
~
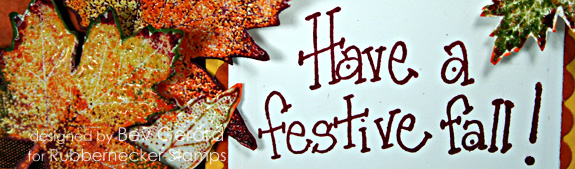
Card Recipe: STAMPS = Leaf Set (Stamp Oasis from Rubbernecker), and Festive Fall (Rubbernecker)
INKS = Tim Holtz Distress Inks: Aged Mahogany, Emboss Ink, Dried Marigold, Mustard Seed, Peeled Paint, Scattered Straw, & Spiced Marmalade.
PAPERS = Prism Simply Smooth White, Crabapple Dark, Intense Yellow, & Papaya Puree Dark
ACCESSORIES = Spellbinders Nestabilities Scallop Rectangles & Classic Rectangles, foam tape, Ranger Clear Embossing Powder, heat tool
10 responses so far


Your leaves are absolutely gorgeous, Bev. I love the technique you used to create the color combination and embossing. The layout is perfect.
Oooooh, GAWWWWJESSS!!!!! OMG, Bev…the leaves are really beautiful and I just love all the yummy fall colors!!!!! This was a great challenge, gf!!!! Thanks for the tutorial, too…I’ll have to give this a try!!! Better yet…maybe you better come to Temple and show me how…ya know how challenged I am….heeheehee!!!
Wow Gorgeous Bev!!
Bev, this card is GORGEOUS!!!! I love the colors you have used here, the leaves, and the gorgeous, gorgeous ribbon. I’m so ready for fall to get here – no more 100+ degree days for me! 🙂
I LOVE THOSE LEAVES!!! Wonderful idea to mottle the colors and embossing!! Beautiful card, Bev!
Your fall card is sooo stunning, Bev!! Your leaves look amazing!!
lovin’ those fun fall leaves! so perfect for this wonderful season!!! 🙂
FINALLY after being without computer I can sneek on here at work… LOL
I must say your card is Beautiful. Although Fall is such a pretty time of the year, I now have moved into a house that is SURROUNDED by HUGE HUGE HUGE trees and they all have LEAVES and not needles… SO I must buy a blower… so I love the card and already HATE the yard work to come! LOL
Have a great weekend Bev!
OOOOH!
I just wanna touch this!!!
It reminds me of a cloisonné pin my grandma would wear on her coat each fall.
The rich colors and the shine are wonderful!
Gorgeous! I love the shine and texture on this card. Wow! Fall already! Love your scraplings set too! SO fun and festive!